Hi I’m Valerio, software engineer from Italy and CTO at Inspector.
As you probably know Bagisto is a great e-commerce platform based on Laravel framework. It is “developer oriented”, so it is very common to implement our extension or use those of other developers by installing external packages.
If you are responsible to keep a bagisto implementation fully operational you probably know that any issue can expose you to competitive or financial risks.
If something goes wrong in your platform, customers will not spend their time to inform you about the problem, they simply close the page, and it may take months before they return.
Thanks to its Laravel foundation Bagisto is a perfect example of how developers can enjoy the ready-to-go Inspector experience, integrating a real-time monitoring system in less than one minute.
Before starting
I will configure Laravel Homestead as development environment so you can eventually reproduce your production environment with no effort.
Using a VM for local development changed my development experience in a positive way so I really invite you to use this setup as well.
In this article I will not dive deep in Homestead installation and configuration, take a look on my Homestead step by step guide to have a complete “how to”: https://inspector.dev/how-and-why-to-use-laravel-homestead-for-local-development-real-life-tips/
Create a Bagisto project
Bagisto ships as composer project, so the best way to start is creating a new composer project using the command below:
composer create-project bagisto/bagistoThis command will create a “bagisto” folder inside the current terminal’s directory.
The first things to do is to complete the configuration in your “.env” file to be sure that your installation have all information to run smoothly.
Open your “.env” file and fill the information below:
APP_URL=http://bagisto.locl
DB_DATABASE=homestead
DB_USERNAME=homestead
DB_PASSWORD=secretAPP_TIMEZONE=Europe/Rome
APP_CURRENCY=eur
Database configurations are needed to make your application ready to run in the Homestead VM, so be sure to copy exactly what reported above.
For APP_TIMEZONE and APP_CURRENCY feel free to use what is appropriate in your case.
Install Homestead
Now it’s time to install Laravel Homestead to create a dedicated VM to use as isolated development environment.
If it’s the first time that you approach with Homestead you need to install VirtualBox and Vagrant in your laptop.
You can download and Install VirtualBox from here: https://www.virtualbox.org/wiki/Downloads
You can download and install Vagrant from here: https://www.vagrantup.com/downloads.html
Generate the Homestead.yaml file
Run the make command based on your OS:
Mac / Linux:
php vendor/bin/homestead makeWindows:
vendor\\bin\\homestead makeThis command will generate the Homestead.yaml file in your project directory.
Open the file in your editor and change the url to reach your Bagisto installation in your browser:
sites:
    -
        map: bagisto.locl
        to: /home/vagrant/code/public
That’s it.
Run the VM with your application inside
In your project’s directory execute:
vagrant upYou will see the booting logs appear in your teminal, it takes just a few seconds, than the console back in your control.
Now the VM is running in your PC and every change you make in your source code will be automatically reported inside the VM, so you can continue to work in your IDE as usual.
Open your browser and past the bagisto installation address:
http://bagisto.locl

Add Real-Time monitoring for your production environment
Now you are able to develop your e-commerce platform and release your code in production.
To monitor how your code performs in production environment we’ll install the Inspector package so you will be able to identify any issues before your users are aware of them.
Inspector is a composer package to add real-time monitoring in Laravel applications, it’s very easy to install and use, and it takes just two minutes to get started.
Thanks to Inspector you no longer need to spend a lot of time to monitor your application behaviour manually, because an autonomous tool does this job for you 24/7, making it rise to the surface anything that could create problems for users.
Let me show you how it works.
Install Inspector
Point your terminal in your project directory and run the command below:
composer require inspector-apm/inspector-laravelConfigure the API key
Get a fresh API key by signing up for Inspector (https://app.inspector.dev/register) and creating a new application, it takes just a few seconds.
You’ll see installation instructions directly in the app screen:
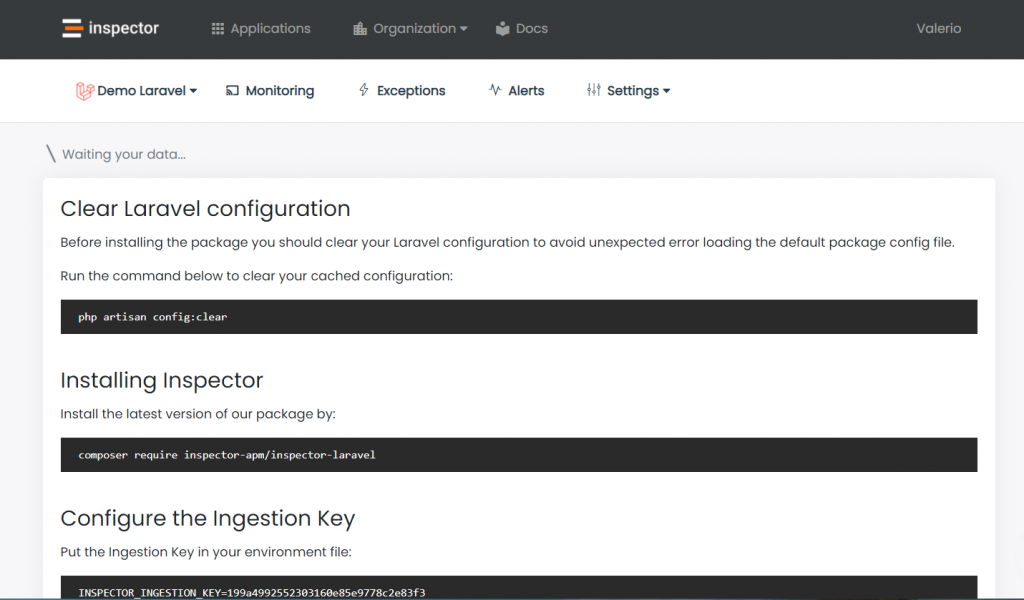
Put the API key into your environment file:
INSPECTOR_API_KEY=13c37c434XXXXXXXXXXXXTest everything is working:
Execute our test command to check if your application is well configured:
php artisan inspector:testGo to https://app.inspector.dev/home to explore your demo data.
Incoming Web Requests monitoring
To activate monitoring when your app is executed due to an incoming http request you can use the WebRequestMonitoring middleware.
It works like any other Laravel middleware you are familiar to so you are free to decide which routes need to be monitored based on your routes configuration or on your personal monitoring preferences.
The most easy way to cover all your application routes is attaching the middleware in the App\Http\Kernel class.
/**
 * The application's route middleware groups.
 *
 * @var  array
 */
protected $middlewareGroups = [
    'web' => [
        ...,
        \Inspector\Laravel\Middleware\WebRequestMonitoring::class,
    ],'api' => [
        ...,
        \Inspector\Laravel\Middleware\WebRequestMonitoring::class,
    ]
]
Instantly you will see transactions streams in your project’s dashboard:

and for each transaction you can monitor what your application is executing in real-time:

Autofix your Laravel application for free
Inspector is a Code Execution Monitoring tool specifically designed for software developers. You don’t need to install anything on the infrastructure, just install the Laravel package and you are ready to go.
If you are looking for effective automation, and the ability to automatically receive code change proposals to fix application errors try Inspector for free. Register your account.
Or learn more on the website: https://inspector.dev